This page is UTF-8 with mixed English and Japanese.
My friend bought this product and showed it to me - I immediately bought it and then of course the first thing you have to do is figure out the user interface and I couldn't find a good pictoral guide to it on the net. So here it is.
All text and image markup Copyright 2008 Ron Dippold, all original images Copyright 2006 Nintendo.
You may of course link to this page all you want, but please respect the work that went into it - you may contact me about other use - email is sizer at san.rr.com.
Rakubiki Jiten is a Kanji Dictionary for the Nintendo DS. It has Japanese->Japanese, Japanese->English, and English->Japanese features. The biggest wins are that it recognizes kanji from your handwriting, lets you kanji pictochat with other users over wifi, and it's extremely cheap compared to dedicated dictionaries. The biggest downsides are that it's intended for native Japanese readers, so the UI is all in Japanese (but this will help) and the navigation among Japanese entries is minimal.
I would recommend using it with Glenn Rosenthal's JWPce if you're near a computer. JWPce's navigation features are better and of course it and jdict are more aimed at English native speakers. But Rakubiki Jiten is great for on the go or if you need to identify a kanji quickly and your SKIP lookup skills are failing. And of course the better you are at reading Japanese the better it becomes, and the more you use this the better you will become at reading and writing kanji!
The first time you load it it'll run you through a tutorial in Japanese. Just keep hitting the touch screen (or touch the little x to the left to exit).
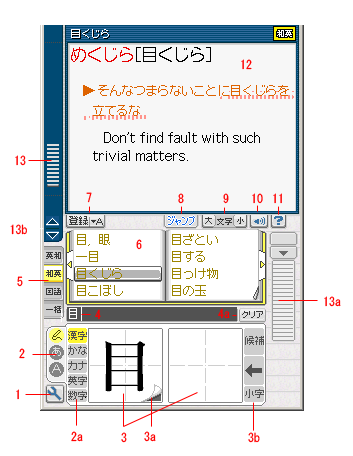
If you click the little blue wrench in the lower left hand corner, you'll get the following screen minus the red and green dots. The green ones are of most interest to us.

(my Photoshop skills are not the greatest, so please excuse the mess).
You can always click the little blue book in the lower right to return to the dictionary. After you enter one of these subcategories you can click the little X close box (とじる) to return to the tool selections.
1 is for training your english vocabulary - probably not too useful for us.
2 is quite useful - it lets you save entries as bookmarks in one of three pages (A, B, C). The little box at the top left of the page is where you do your saving. Choose A/B/C by touching the A box and add it to your list by hitting the 登録 (record) button to the left. More on this in bookmarks.
3 will test your Japanese skills - they're intended for native speakers, so if you're reading this page for help these quizzes will crush you.
4 is extended help for the program - for a native Japanese speaker. Forget it.
5 sends your bookmarks to your friends. I'm not really interested in this, so didn't document it. If you really want this let me know.
6 chats with your friends via WiFi - the killer bit here is that once you enter a chat room all the kanji lookup and entry functions still work. Choose your chat room, then draw in the upper area of the lower screen. You can use one of the entry methods on the left to enter symbols. Hit the upper icon in the lower right to send, hit the next icon down to get your last screenful back, hit the next icon to clear the entry area. Finally, the bottom right icon lets you to the dictionary - then hit the down area to select any part of the upper screen backscroll (use the up/down cursor to select) and hit the down icon again to load it into into your sending area, then you can mark it up as you want and send it!
7 is very useful. In the upper left you have auto power off time (パワーオフ時間) - off, 5 minutes, 30 minutes. In the upper right you have sound (サウンド) on/off. In the lower left (I'm going to skip entering all that kanji) is the amount of time you can pause between strokes before it decides you're done entering kanji - your three choices are short (短), average (普通), and long (長い). Long can be a lifesaver on complex kanji. Finally, in the lower right is touch voice (タッチヴォイス), which will speak (some) things as you look them up or enter them.
You should also see letter size down below.
8 toggles the list entries in the 'book' between large (4 lines) and small (5 lines) font. I have enough trouble with the kanji without them being even more pixellated, so I leave it large.
9 shows the current time in various countries and cities. Green entries are countries, blue entries are cities, and you can toggle them with the green and blue dots under the list.
Upper right box is Japan Time (日本時間), right below that is Summer Time (daylight savings) toggle (スマータイム).On the left side of 10 you can set a countdown timer in hours and minutes (hit the button right above (スタト) to start the countdown. Choose one of the three alarms on the right side to set them (the top right is what it thinks the current time is). For each alarm the top row is days of the week from Sunday, second row is every week (毎週) or one time (一回), on/off, then the time.
I know you're smart enough to know how to use 11.
12 Choose any month 1-12月(by tapping) from 1900 to 2099年(by using the left/right tabs). Hit the little box below for today (今日) .
This is a good place to list what the buttons on the DS do.
| Button | Function |
|---|---|
| A | Select an entry from the book (area 6), accept dialog choices. |
| B | Delete a character from area 4, abort dialogs. |
| X | Toggle output window (area 12) font size. |
| Y | Toggle between character entry modes for area (area 2) |
| L/R | Scroll output window (area 12) up and down by a page. Same as 13b. |
| d-pad | Up and down scroll output window (area 12) up and down slowly. Left and right choose items in the book (area 6). |
| start | nothing |
| select | nothing |
1 just takes you to the tools we just discussed.
2 through 4 select how you'll input characters. This deserves a further breakout:
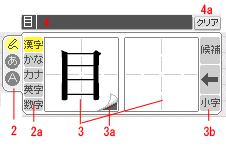
The top entry in 2 indicates stylus entry. The entries in 2a let you fine tune the character recognition a bit by narrowing the choices:
though if you're not entering kanji you can just use one of the keyboards below. You draw your figure in one of the blank areas of 3 - it doesn't really matter which one. There are two of them so you can alternate.
Important:Your stroke order really needs to be accurate for best recognition. That said, if you already knew the kanji you wouldn't need to be looking it up, so you can fake it with the following general rules:
There are three ways to choose another similar glyph if it picked the wrong one. Touch the little paper fold (3a); touch the upper box in 3b (candidates 候補) ; touch the character in the input line (4). 3a is nicest because you get a large stroke representation left in the box, but 4 is the only thing you can do if already added other characters.
If you're entering a diminutive character (a small っinstead of つ) then enter the large character and then hit the 小字 button at the bottom of 3b.
Finally, to just say to heck with it hit the back arrow in 3b or the B button. This will blank out the boxes and clear the last character in 4. You can erase everything with 4a (クリア).
It's very important that you keep track of what's in entry area 4. If you accidentally leave a character there and then painstakingly enter the next kanji there's no way (that I found) to remove an intermediate character while keeping the later one, so you'll have to delete them both.
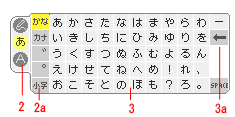
This is simple enough. The あ in area 2 chooses kana entry. Use the top two entries in 2a to choose hiragana or katakana. After you've chosen a character it'll appear in the entry area (right above) and then you can hit the ゛or ゜ in 2a to make your は a ば or ぱ, or the 小字 button at the bottom to make a や into a smaller ゃ. Finally, notice that in the upper right is the extender line for マーカー.
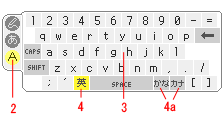
Again, this shouldn't be too hard. Tap the A in area 2 to switch to english mode, then type away in 3. The only tricky thing here are the 英 (English), かな (hiragana), and カナ (katakana) buttons at 4 and 4a. If you're in English mode (4) roman letters are entered, but if you're in hiragana or katakana modes (4a) then you can actually enter the kana by entering the appropriate letters - for example, in かな mode k then u gets you く in the entry area. Just in case you really can't remember a kana.
Here's the main screen again:
Area 5 chooses which book lookup mode you're in:
It's really important to watch out for this, because red entries will be all Japanese text and if you're trying to look up 'cat' while in Japanese to English Mode you'll be sorely disappointed. Generally you can just leave it in 一括 Mixed mode.
In English to Japanese (or Mixed) modes you get another item on the screen between 7 and 8. which looks like this:

If you touch the left side of the button (成句) to turn it green, you'll get the idiomatic phrase entries for each English word listed in green below then blue main word. Touch the entry to go to the right part of the main entry. Or you could get to them by scrolling the entry down (see below).
If you touch the right side of the button (派・複) you'll get the derivatives and compounds listed in light blue.
Area 6 has all the possibilities based on the characters in area 4 and the mode in area 5. Here I'm in Japanese to English mode, so only brown entries are shown. You can scroll left and right by touching the little left and right arrows, or just sweep the stylus across the area like turning a page. If you click an entry it pops up in area 12. Or use the left and right on the d-pad to scroll through the entries then A to select.
There are three sets of bookmarks you can keep for fast recall or drills. The right side of area 7 chooses which set of bookmarks (A, B, or C) you're going to be saving in. Hit the left side (登録) to add an entry. A little black box will pop up on the top screen that tells you it added the entry (in white) to bookmark set A/B/C (in purple). See bookmarks below for more info.
If the entry has hyperlinks in it you can hit button 8 and get a pop-up window that lets you scroll through the entry with the left and right cursor keys or by tapping on the left and right buttons in the popup. Then hit A to go to the linked entry, or B to cancel. Unfortunately this only works with English words, which is a real heartbreaker when you see a kanji phrase on the top screen you'd like defined.
Area 9 chooses the letter size for area 12. This can be a real lifesaver since complicated kanji are hard to read at small font sizes unless you know them well. Touch the left side (大) to make the font larger, and the right side (小) to make them smaller. The X button also toggles between all four sizes.
Click button 10 to have it say the word again. This only works if you see the same symbol in the entry and it's usually just for English words.
Get help by clicking button 11. Of course it'll be in Japanese, so not so useful. In the popup click the left button to see the tutorial again or the right button then an area of the screen to get help with it.
Area 12 is where all your entries show up. Use the up and down on the d-pad or scroll wheel 13a to scroll it slowly. Use L and R triggers or the arrows of 13b to scroll a page at a time. The scroll bar (13) shows you where you are in the entire scrollback with a slightly hard to see grey bar on the white bars.
You get to the bookmarks screen by choosing the little blue wrench in the lower left hand side of the main screen then the second button in the left column (しおり). There are three sets of bookmarks, A, B and C.
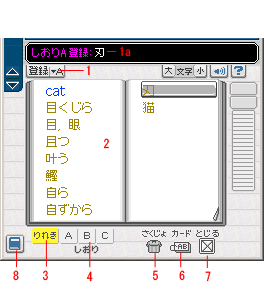
You'll start out on the history (りれき) page with button 3 highlighted and area 2 showing all the entries you've recently looked at. You can select any of them with the cursor and then use the right side of button 1 to choose which set of bookmarks to save this in, then hit the left side of the button to save it. You can see in area 1a that I've just added 切 to bookmark (しおり) set A.
You can clear out the history by hitting the trash can at 5 (さくじょ) or return to the where you were by hitting the close button at 7 (とじる) . This will save your lists.
Hit A B or C at area 4 to see that set of bookmarks.
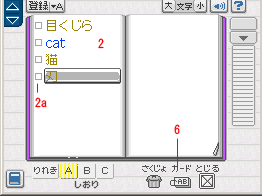
Area 2 has all your bookmarks. 2a lets you check each one as you think you've got it mastered. You can drag any entry to another position in the list or to the trash can at 5 (さくじょ). Caution:If you just click on the trash can and then hit A to confirm, you will be wiping out your entire bookmark set, and I don't think there's an undo.
If you hit button 6 (カード) you get to play flashcards. I'm not going to go into this unless there's demand.
That's it! I hope this is useful, and remember I suggest you use this in conjunction with another program like JWPce that's designed for native English readers. Use Rakubiki Jiten to find out what the kanji is, then if the entry isn't informative enough just enter the hiragana into JWPce. It's a beautiful combination.